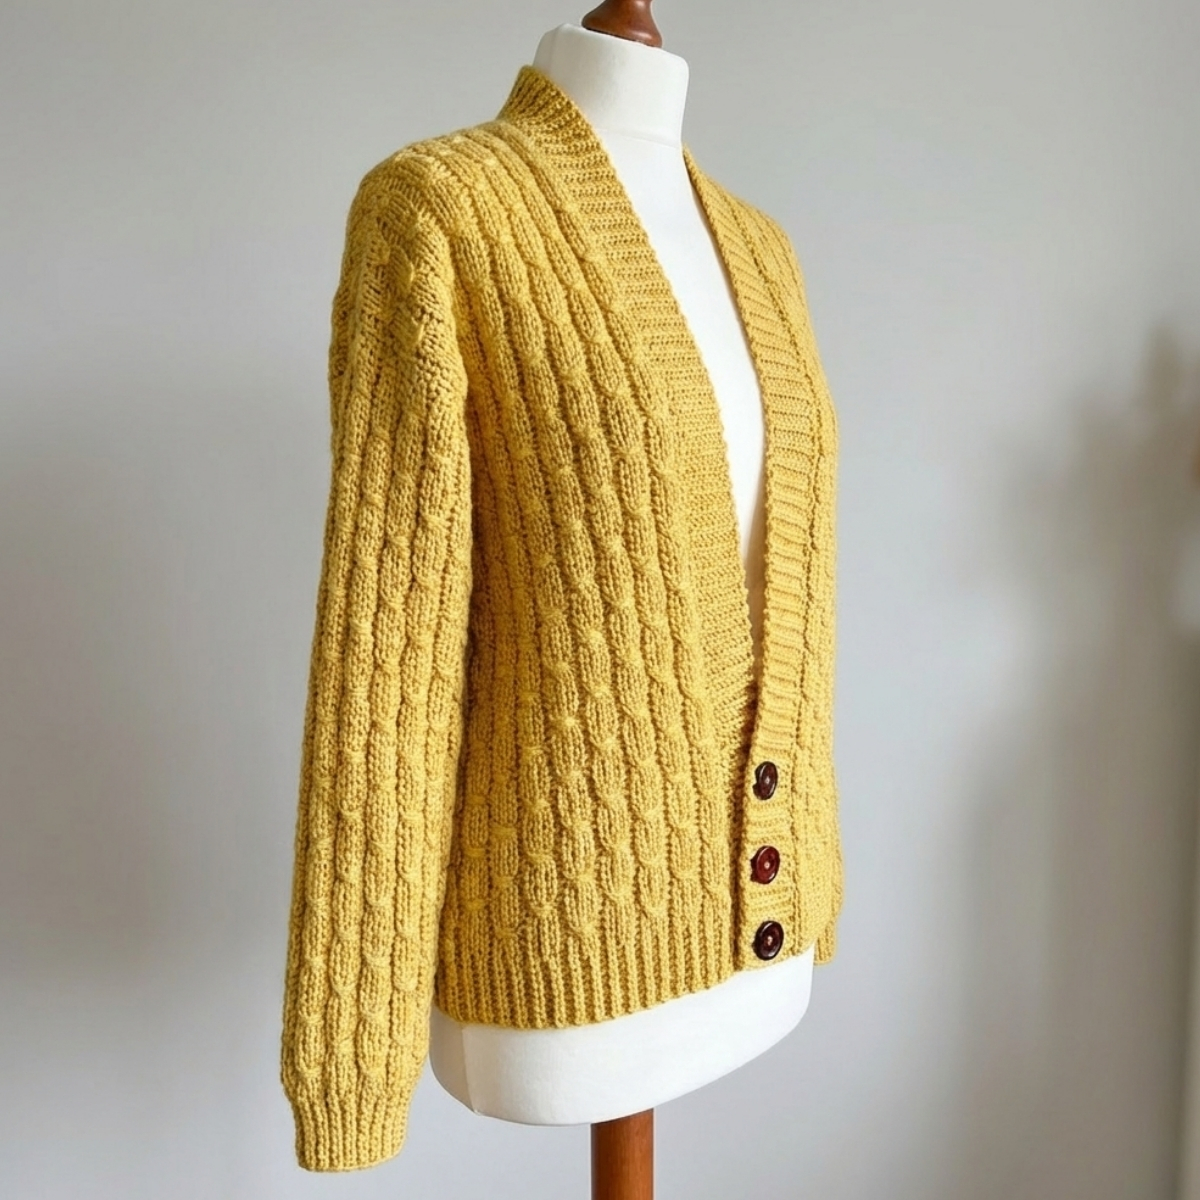
If you have been searching for a crochet cardigan that looks like it came straight off a boutique rack, this is the one. The Amber Frost crochet cardigan is one of those projects I am genuinely proud of every time I put it on. It features a stunning textured stitch that mimics the look of a knit cable, a sideways construction that gives it the most beautiful drape, and classic ribbed edges with button closures that make it feel polished and complete. It is the kind of piece that elevates your wardrobe without you having to spend a fortune.
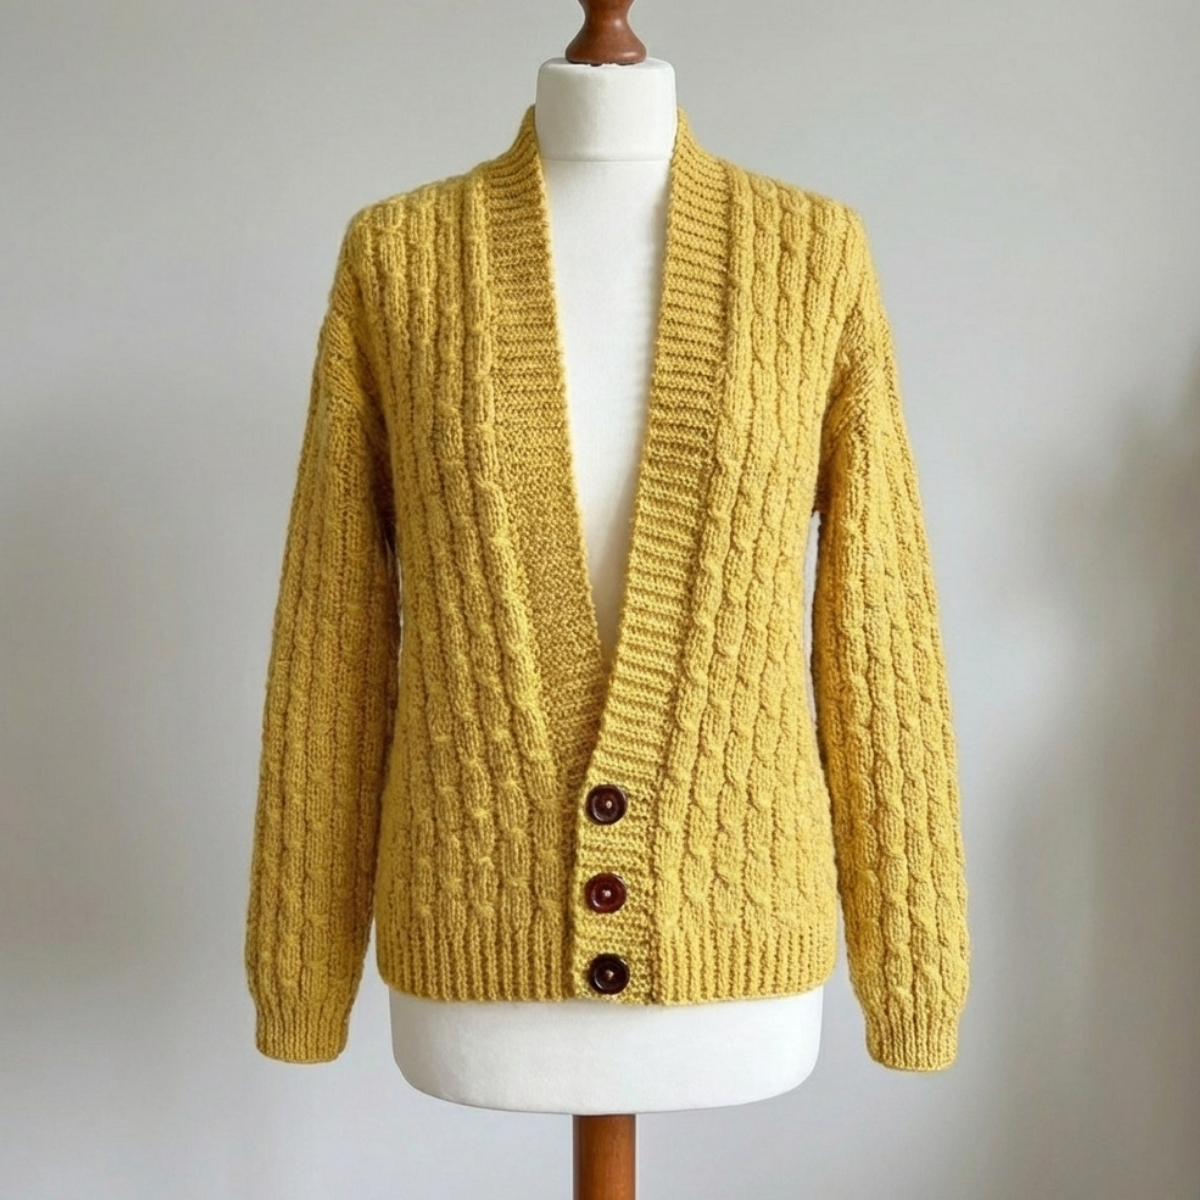
This free crochet cardigan pattern is sized from Small to 3XL, so there is truly something here for everyone. Whether you are crocheting for yourself or making it as a gift, I think you are going to fall in love with how this one comes together.
Materials and Tools
Here is everything you need to make the Amber Frost crochet cardigan:
- Drops Lima, DK weight / size 3, 65% wool and 35% alpaca, 50g / 100m / 109 yds per ball
- Approx. 16(18, 18, 19, 19, 20) balls for sizes S(M, L, XL, 2XL, 3XL)
- 4.5mm / US G-7 crochet hook
- Yarn needle
- 3 buttons, 1 inch diameter
A quick word on yarn choice. I used Drops Lima for this pattern and I could not recommend it more highly. It is a beautiful wool and alpaca blend that has just the right amount of drape and structure for a wearable garment. That said, any DK weight yarn with a similar gauge will work perfectly. The one thing I would strongly suggest is avoiding anything too fluffy or fuzzy. The Wrap Around stitch requires you to insert your hook into specific parts of the stitch, and a halo yarn will make that genuinely difficult to see and work with.
Gauge and Finished Size
Gauge: 19 sts x 5 “cables” = 4 x 4 inches
Finished Bust Measurements:
| Size | S | M | L | XL | 2XL | 3XL |
|---|---|---|---|---|---|---|
| Finished bust (in) | 36 | 40 | 44 | 48 | 52 | 56 |
| Length (in) | 22 | 22 | 23 | 24 | 24 | 25 |
| Arm circumference (in) | 15 | 16 | 16 | 17 | 17 | 18 |
Skill Level: Intermediate, using standard US terms.
Pattern Notes
The Amber Frost cardigan is constructed sideways. That means your foundation chain determines the length of the cardigan, and you work rows across to build up the width of each panel. It is a different way of working compared to a top-down or bottom-up construction, but once you understand the concept it makes a lot of sense and gives the fabric a really lovely flow.
The back panel is worked first, then two matching front panels are worked in the same way with fewer rows. The sleeves are also worked sideways. Once all pieces are finished, the front panels are seamed to the back panel across the shoulders, the side seams are joined leaving armhole openings, and the sleeves are sewn in. Finally, the ribbed button collar is crocheted as a separate strip and sewn along the entire inner edge of the cardigan.
All sizes are written as S(M, L, XL, 2XL, 3XL) throughout the pattern.
Abbreviations
- ch = chain
- st/s = stitch/es
- slst = slip stitch
- rep = repeat
- yoslst = yarn over slip stitch
- yoslstBLO = yarn over slip stitch, back loop only
- yoslst3L = yarn over slip stitch in the third loop
- hdcBLO = half double crochet, back loop only
- WA = wrap around stitch
Special Stitches
Wrap Around (WA)
This is the signature stitch of the Amber Frost cardigan and the one that creates that beautiful cable-like texture. It looks impressive, but after a few practice runs it becomes very easy to do.
Yarn over. Insert hook into the designated stitch from the back of the work to the front, working into the third row of horizontal “Vs.” You will be inserting the hook under the bottom leg of the V. Yarn over and pull through. Pull your yarn up slightly so it sits at the same height as the other stitches. You should now have 4 loops on the hook. Pull the top loop through the second loop. You now have 3 loops on the hook. Yarn over and pull through the remaining 3 loops.
The key thing to remember is to always insert into the correct row of Vs below your working row. It takes a little getting used to but the results are absolutely worth it.
Yarn Over Slip Stitch (yoslst)
Yarn over, insert hook into the designated stitch, yarn over and pull up a loop. You should have 3 loops on the hook. Pull the last loop through the other two loops on the hook.
Yarn Over Slip Stitch in the Third Loop (yoslst3L)
When you look at your work you will see the usual V of the stitch. If you lay your work flat you will also notice a horizontal bar at the front of the stitch. That horizontal bar is the third loop. Yarn over, insert hook into that third loop of the designated stitch, pull up a loop. You should have 3 loops on the hook. Pull the last loop through the other two loops on the hook.
Pattern Instructions
Back Panel
S(M, L, XL, 2XL, 3XL)
Ch 105(105, 111, 117, 117, 123)
Row 1: Yoslst in 2nd ch from hook and in each ch across, turn. [104(104, 110, 116, 116, 122) sts]
Row 2: Ch 1, 9 yoslstBLO, hdcBLO in each remaining st across, turn.
Row 3: Ch 1, yoslst3L in each st across until 9 sts remain, 9 yoslstBLO, turn.
Row 4: Ch 1, 11 yoslstBLO, WA, *5 yoslstBLO, WA, rep from * across until 2 sts remain, yoslstBLO, turn.
Row 5: Ch 1, yoslstBLO in each st across, turn.
Row 6: Ch 1, 9 yoslstBLO, hdcBLO in each remaining st, turn.
Row 7: Ch 1, yoslst3L in each st across until 9 sts remain, 9 yoslstBLO, turn.
Row 8: Ch 1, 14 yoslstBLO, *WA, 5 yoslstBLO, rep from * across, turn.
Repeat Rows 1 through 8 until you have a total of 22(25, 27, 30, 32, 35) “cables” completed. You must end on either a Row 4 or a Row 8 depending on how many cables you need for your size.
Fasten off.
Front Panels (Make 2)
Ch 105(105, 111, 117, 117, 123)
Repeat Rows 1 through 8 as for the back panel until you have a total of 9(10, 11, 12, 14, 15) “cables” completed.
Fasten off, leaving a long tail for seaming.
Sleeves (Make 2)
Ch 87
Row 1: Yoslst in 2nd ch from hook and in each ch across until 9 sts remain, slst 9 sts, turn. [86 sts]
Row 2: Ch 1, 9 slstBLO, hdcBLO in each remaining st, turn.
Row 3: Ch 1, yoslst3L in each st across until 9 sts remain, 9 slstBLO, turn.
Row 4: Ch 1, 9 slstBLO, yoslstBLO 2, *WA, yoslstBLO 5, rep from * across until 2 sts remain, 2 yoslstBLO, turn.
Row 5: Ch 1, yoslstBLO in each st across until 9 sts remain, 9 slstBLO, turn.
Row 6: Ch 1, 9 slstBLO, hdcBLO in each remaining st, turn.
Row 7: Ch 1, yoslst3L in each st across until 9 sts remain, 9 slstBLO, turn.
Row 8: Ch 1, 9 slstBLO, 5 yoslstBLO, *WA, 5 yoslstBLO, rep from * across, turn.
Repeat Rows 1 through 8 until you have a total of 18(19, 19, 20, 20, 21) “cables” completed.
Fasten off, leaving a long tail for seaming. Fold the sleeve in half lengthways with the right side on the inside. Using your yarn needle and the tail, seam the edges of the sleeve together.
Assembly
Lay the back panel on a flat surface with the right side facing up. Place the two front panels on top, wrong side facing up. Seam across the shoulders to connect the pieces together. Then seam up along the sides, leaving a 7.5(8, 8, 8.5, 8.5, 9) inch opening for the armholes. Sew the sleeves in, with the seam of each sleeve facing downward, into the armhole openings.
Button Up Collar
Ch 10
Row 1: Yoslst in 2nd ch from hook and in each ch across, turn. [9 sts]
Row 2: Ch 1, yoslstBLO in each st across, turn.
Row 3: Ch 1, 4 yoslstBLO, ch 3, skip next st, yoslstBLO in remaining 4 sts, turn.
Row 4: Ch 1, yoslstBLO in each st across placing 1 yoslst in the ch 3 space, turn. [9 sts]
Rows 5-11: Ch 1, yoslstBLO in each st across, turn.
Row 12: Ch 1, 4 yoslstBLO, ch 3, skip next st, yoslstBLO in remaining 4 sts, turn.
Row 13: Ch 1, yoslstBLO in each st across placing 1 yoslst in the ch 3 space, turn. [9 sts]
Rows 14-20: Ch 1, yoslstBLO in each st across, turn.
Row 21: Ch 1, 4 yoslstBLO, ch 3, skip 1, yoslstBLO in remaining 4 sts, turn.
Row 22: Ch 1, yoslstBLO in each st across placing 1 yoslst in the ch 3 space, turn. [9 sts]
Row 23: Ch 1, yoslstBLO in each st across, turn.
Repeat Row 23 until the ribbed collar strip is long enough to go around the entire inner edge of the cardigan.
Using your yarn needle, sew the ribbed collar to the inner edge of the cardigan. Sew your 3 buttons in place to match the buttonholes. Weave in all ends.
Tips
Here are a few things I found really helpful while making this Amber Frost crochet cardigan.
Practice the Wrap Around stitch before you start the cardigan. Seriously. Crochet a small swatch of about 20 stitches and work through a couple of repeats of Rows 1 through 8. The stitch clicks quickly and you will feel so much more confident once you head into the actual project.
Pay close attention to which row of Vs you are inserting your hook into for the WA stitch. Always look down three rows of horizontal Vs and insert under the bottom leg of the V in that row. If you insert too high or too low the cable effect will not come out correctly.
Keep your tension consistent throughout. Because this cardigan is worked in pieces and seamed together, matching tension across all panels will make assembly much easier and the finished garment will hang more evenly.
Take your time with the collar. It is a long strip that needs to fit all the way around the inner edge of the cardigan, so measure as you go and keep trying it against your work rather than crocheting the whole thing and hoping for the best.
Block your finished pieces before seaming if you are using a natural fiber yarn. Even a light wet block will help the panels lay flat and make sewing the seams so much more manageable.
Frequently Asked Questions
What size yarn do I need for the Amber Frost crochet cardigan? This pattern uses DK weight, also called weight 3, yarn. I used Drops Lima which is a wool and alpaca blend and it is absolutely beautiful for this project. You can substitute any DK weight yarn with a similar gauge. Just avoid anything with a halo or heavy texture as it will make the Wrap Around stitch much harder to work.
Is the Amber Frost cardigan pattern suitable for beginners? This is listed as an intermediate pattern. If you are comfortable with basic stitches and have made a garment or two before, you will be well equipped to take this on. The Wrap Around stitch is the main new technique to learn, but it is very manageable once you practice it a few times. Absolute beginners may find it a little challenging at first.
How is the Amber Frost crochet cardigan constructed? It is worked sideways, which means each panel is crocheted from one side edge to the other rather than from the hem up. The back panel, two front panels, and two sleeves are all worked separately and then seamed together. The ribbed collar is crocheted as a long strip and sewn along the inner edge last.
How many balls of yarn do I need? You will need approximately 16(18, 18, 19, 19, 20) balls of DK weight yarn for sizes S(M, L, XL, 2XL, 3XL). Each ball of Drops Lima contains 100m / 109 yards. I always recommend buying one extra ball just in case, especially if you are a slightly looser crocheter.
Can I use a different hook size for this pattern? The pattern is written for a 4.5mm / US G-7 hook. However, what matters most is that you match the gauge of 19 sts x 5 cables = 4 x 4 inches. If your tension runs loose, go down a hook size. If your tension runs tight, go up a hook size. Always crochet a gauge swatch before starting a garment.
I share daily crochet inspiration on Pinterest. Save this article to your Pinterest boards so you can come back to it whenever you are ready to start.


