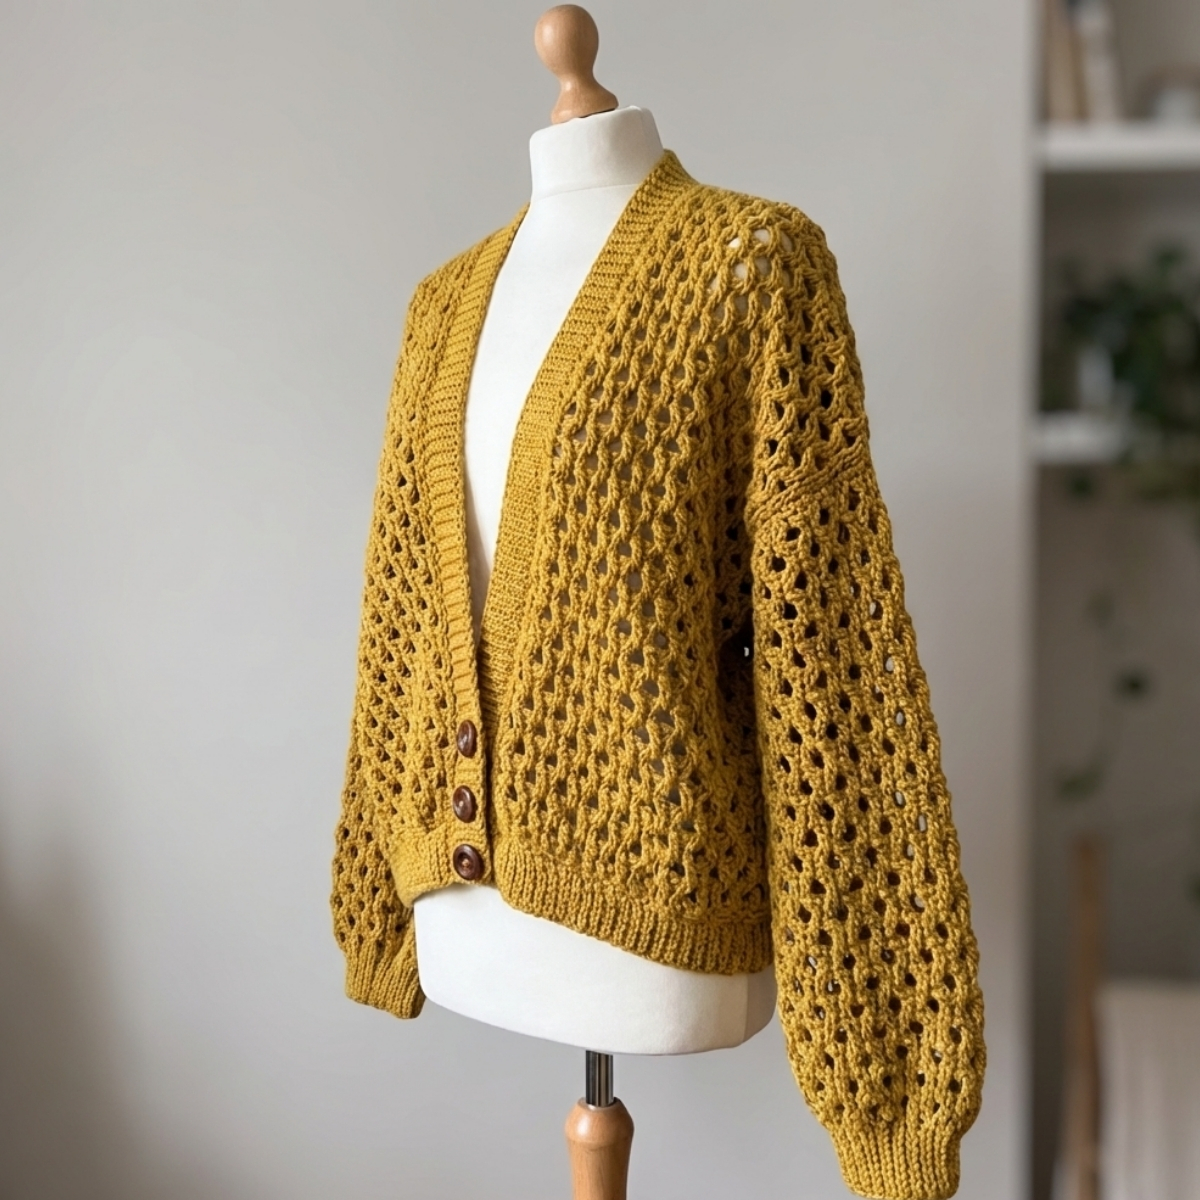
I recently discovered the most precious stitch and immediately I had to design the perfect autumnal cardigan around it. That is how the Bonfire Cardigan was born. It is full of beautiful texture, made up of only basic crochet stitches, and honestly it is perfect for the adventurous crochet beginner. The stitching reminds me of fire flames, which felt so right for this time of year. Every Halloween here in Ireland it is tradition for every neighbourhood to build a bonfire, so naming this free crochet cardigan pattern after that felt like a perfect fit.
Materials and Tools
- Yarn: Patons Fab DK, 100% acrylic, weight 3 / DK / 8 ply, 100g / 274m per ball
- Approximately 5(6, 6, 6, 7, 7) balls
- 4.5 mm crochet hook
- 3 buttons, approximately 1 inch diameter
- Scissors and yarn needle
- Stitch markers (helpful for seaming)
Gauge and Finished Size
Gauge: 19 sts x 16 rows = 4 inches / 10 cm
Gauge matters for this project. Take the time to swatch before starting so your finished cardigan comes out the right size.
Sizing: S(M, L, XL, 2XL, 3XL)
Finished Bust: 42(46, 50, 54, 58, 62) inches
Length: 22(22, 22, 24, 24, 24) inches
Armhole: 7(7.5, 7.5, 8, 8, 8.5) inches
Pattern Notes
This Bonfire Cardigan is worked lengthways, not widthways. That means your initial foundation chain determines the length of the cardigan, not the width. Keep that in mind before you start.
The cardigan is slightly oversized in fit. You can easily customize the fit by adding or subtracting rows. The length can also be adjusted by adding more chains to the foundation, keeping in mind the stitch pattern is worked over multiples of 6 + 3 chains.
The cardigan is made in five separate pieces: the back panel, two front panels, and two sleeves. Once all pieces are finished, you seam the front panels to the back at the shoulders, then seam up the sides leaving openings for the armholes. The sleeves are attached next. The bottom ribbing and neckline button band are each crocheted separately and sewn on. Buttons are added at the very end.
Abbreviations
- ch = chain
- dc = double crochet
- slst = slip stitch
- yoslst = yarn over slip stitch
- blo = back loop only
- rep = repeat
- st(s) = stitch(es)
- rem = remain(ing)
Special Stitches
Yarn Over Slip Stitch (yoslst): Yarn over, insert hook into designated stitch, pull up a loop. You now have 3 loops on your hook. Pull the first loop through the second and third loops.
Bonfire Cardigan Pattern Instructions
Back Panel
Ch 99(99, 99, 105, 105, 105)
Row 1: Yoslst in 2nd ch from hook and into each ch across, turn.
You will be working into the blo of every stitch from now on and throughout.
Row 2: Ch 1, yoslst in 1st st, *ch 3, skip 3, dc in next, slst into each of the next 2 sts, rep from * across placing a yoslst into last st, turn.
Row 3: Ch 1, yoslst into each st across, turn.
Row 4: Ch 1, yoslst into each of the next 2 sts, slst into each of the next 2 sts, *ch 3, skip 3, dc into next st, slst into each of the next 2 sts, rep from * across until 4 sts rem, ch 2, skip 2, dc into next st, yoslst in last st, turn.
Row 5: Ch 1, yoslst into each st across, turn.
Repeat rows 2 to 5 until the end of row 85(93, 101, 109, 117, 125).
Fasten off.
Front Panel (Make 2)
Ch 99(99, 99, 105, 105, 105)
Row 1: Yoslst in 2nd ch from hook and into each ch across, turn.
You will be working into the blo of every stitch from now on and throughout.
Row 2: Ch 1, yoslst in 1st st, *ch 3, skip 3, dc in next, slst into each of the next 2 sts, rep from * across placing a yoslst into last st, turn.
Row 3: Ch 1, yoslst into each st across, turn.
Row 4: Ch 1, yoslst into each of the next 2 sts, slst into each of the next 2 sts, *ch 3, skip 3, dc into next st, slst into each of the next 2 sts, rep from * across until 4 sts rem, ch 2, skip 2, dc into next st, yoslst in last st, turn.
Row 5: Ch 1, yoslst into each st across, turn.
Repeat rows 2 to 5 until the end of row 35(39, 43, 47, 51, 55).
Fasten off leaving a long tail.
Sleeves (Make 2)
Ch 89 for all sizes.
Row 1: Yoslst in 2nd ch from hook and in each ch across until 8 chains rem, slst in rem 8 chains, turn.
You will now be working into the blo of every stitch from now on and throughout.
Row 2: Ch 1, slst in each of the next 8 sts, yoslst in next st, *ch 3, skip 3, dc in next st, slst in each of the next 2 sts, rep from * across, placing a yoslst in last st, turn.
Row 3: Ch 1, yoslst in each st across until 8 sts rem, slst into each of the last rem 8 sts, turn.
Row 4: Ch 1, slst into each of the next 8 sts, yoslst into each of the next 2 sts, slst into each of the next 2 sts, *ch 3, skip 3, dc into next st, slst into each of the next 2 sts, rep from * across until 4 sts rem, ch 2, skip 2, dc into next st, yoslst in last st, turn.
Row 5: Ch 1, yoslst in each st across until 8 sts rem, slst into each of the last rem 8 sts, turn.
Repeat rows 2 to 5 until the end of row 57(61, 61, 65, 65, 69). For the very last row, work a row of slsts instead of yoslsts to minimize a stark line at the seam.
Fasten off leaving a long tail.
Assembly
Lay the back panel on a flat surface with the right side facing up. Place both front panels on top with their right sides facing down. Using a yarn needle and the long tails, seam across the shoulders. Then seam up along the sides of the cardigan, leaving a gap of 7(7.5, 7.5, 8, 8, 8.5) inches at the top for the armholes.
Seam both sleeves to the cardigan.
Bottom Hemline Ribbing
Ch 9.
Row 1: Slst into 2nd ch from hook and into each ch to the end, turn.
Row 2: Ch 1, slst blo into each st across, turn.
Repeat row 2 until the ribbing is long enough to go around the entire bottom edge of the cardigan, from the bottom of front panel 1, across the back panel, and around to front panel 2. You can stretch the ribbing slightly as you go.
Fasten off leaving a very long tail. Attach with stitch markers to hold in place, then sew the ribbed hem to the bottom of the cardigan.
Neckline Ribbed Button Band
Ch 9.
Row 1: Slst into 2nd ch from hook and into each ch across, turn.
Row 2: Ch 1, slst blo into each st across, turn.
Row 3: Ch 1, slst blo into next 3 sts, ch 2, skip 2, slst blo in last 3 sts, turn.
Rows 4 to 11: Ch 1, slst blo into each st across, turn.
Row 12: Ch 1, slst blo into next 3 sts, ch 2, skip 2, slst blo in last 3 sts, turn.
Rows 13 to 20: Ch 1, slst blo into each st across, turn.
Row 21: Ch 1, slst blo into next 3 sts, ch 2, skip 2, slst blo in last 3 sts, turn.
Row 22: Ch 1, slst blo into each st across, turn.
Repeat row 22 until the ribbing is long enough to go around the entire inner edge of the cardigan.
Fasten off leaving a very long tail. Pin in place with stitch markers and sew in place.
Weave in all ends and add your 3 buttons to the button band. Your Bonfire Cardigan is done!
Tips for Crocheting the Bonfire Cardigan
Because this cardigan is worked lengthways, the stitch pattern can feel a little unusual at first. Give yourself a few rows to get comfortable with the rhythm before you dive into the full piece.
The yoslst creates that gorgeous flame-like texture. It is worked similarly to a regular slip stitch but with a yarn over first, which gives each stitch a little extra body and definition. Take it slowly on your first row until it clicks.
Use stitch markers generously during assembly. The seaming is much easier when everything is pinned in place and you can check the alignment before committing with your yarn needle.
If you want a longer cardigan, simply add more chains to the foundation in multiples of 6 + 3. If you want a slimmer fit, reduce the number of rows on the back and front panels rather than changing the foundation chain.
Blocking the finished pieces before assembly makes a real difference. It evens out the texture and makes seaming much cleaner.
Frequently Asked Questions
Is the Bonfire Cardigan suitable for beginners? It is a great project for adventurous beginners. The stitches used are basic, including chains, double crochet, and slip stitches. The yoslst is easy to learn and the pattern explains it clearly. If you are comfortable working in rows and seaming pieces together, you will be just fine.
What does it mean that the cardigan is worked lengthways? Working lengthways means your foundation chain runs from the bottom hem to the top of the cardigan instead of across the width. So the number of chains you start with determines how long your finished cardigan will be, not how wide it is.
Can I use a different yarn for the Bonfire Cardigan? Yes, any DK weight yarn will work. Just make sure to swatch and match the gauge of 19 sts x 16 rows to 4 inches. The drape and texture will vary slightly depending on the fibre content you choose.
How do I adjust the size of the Bonfire Cardigan? You can make the cardigan wider by adding rows to the back and front panels. You can make it longer by adding chains to the foundation in multiples of 6 + 3. Subtracting rows will slim the fit. It is a very flexible pattern to customize.
How much yarn do I need for the Bonfire Cardigan? You will need approximately 5 balls for a small, 6 balls for a medium, large, or XL, and 7 balls for a 2XL or 3XL. Each ball of Patons Fab DK is 100g and 274 meters.
I share daily crochet inspiration on Pinterest. Save this article to your Pinterest boards so you can come back to it whenever you are ready to start.


