He is cute. He is squishy. He is honestly one of my favorite things I have ever made. This crochet amigurumi bunny is everything I wanted in a little stuffed animal, and I am so excited to share the full pattern with you. If you are looking for a quick, fun, and completely satisfying crochet project, this squishy bunny is it.
I took everything I loved about a few of my past projects and combined it into this one perfect little guy. The result is an egg-shaped crochet bunny that works up fast, feels incredibly soft, and makes the sweetest Easter gift or spring decoration. Whether you are making this crochet amigurumi bunny for a child in your life or just keeping it for yourself (no judgment), I think you are going to love every stitch.
Materials and Tools
Here is everything you need to make your own crochet amigurumi bunny:
- Premier Parfait Chunky, size 6 super bulky weight, 100% Polyester, 131 yds/120m per 3.5 oz/100g skein
- 1 skein #1150-01 White, approximately 70 yards
- #1150-18 Ballet Pink, 1 yard (for nose embroidery)
- Soho Skwishy (optional alternative), size 5 bulky weight, 100% Polyester, 131 yds/120m per 3.5 oz/100g skein
- 1 skein #1017 Lilac, approximately 70 yards
- US H8 / 5.00 mm crochet hook
- 12 mm safety eyes (embroider instead if making for a baby or young child)
- Stitch markers
- Fiberfill stuffing
- Tapestry needle and scissors
I am a huge fan of Premier Parfait Chunky for this project. It crochets up so beautifully and the chenille texture gives the finished bunny that irresistibly squishy feel. I personally use a smaller hook than recommended for this yarn weight to give the fabric just the right amount of stiffness so the stuffing does not poke through.
Gauge and Finished Size
Gauge: 6 sc to 2 inches. Gauge is not critical for this pattern. You can use other yarn weights and simply adjust your hook size accordingly.
Finished Size: Approximately 4.5 inches tall (not including ears) x 4 inches wide.
Pattern Notes
This crochet amigurumi bunny is worked in continuous rounds, starting at the top of the head and working down to create an egg shape. The ears are made separately and sewn on at the end.
You will want to use a stitch marker to keep track of the beginning of each round, especially in the earlier rows where all the increases happen. I always recommend stuffing as you go once you reach the decrease rounds so you get an even, plump result.
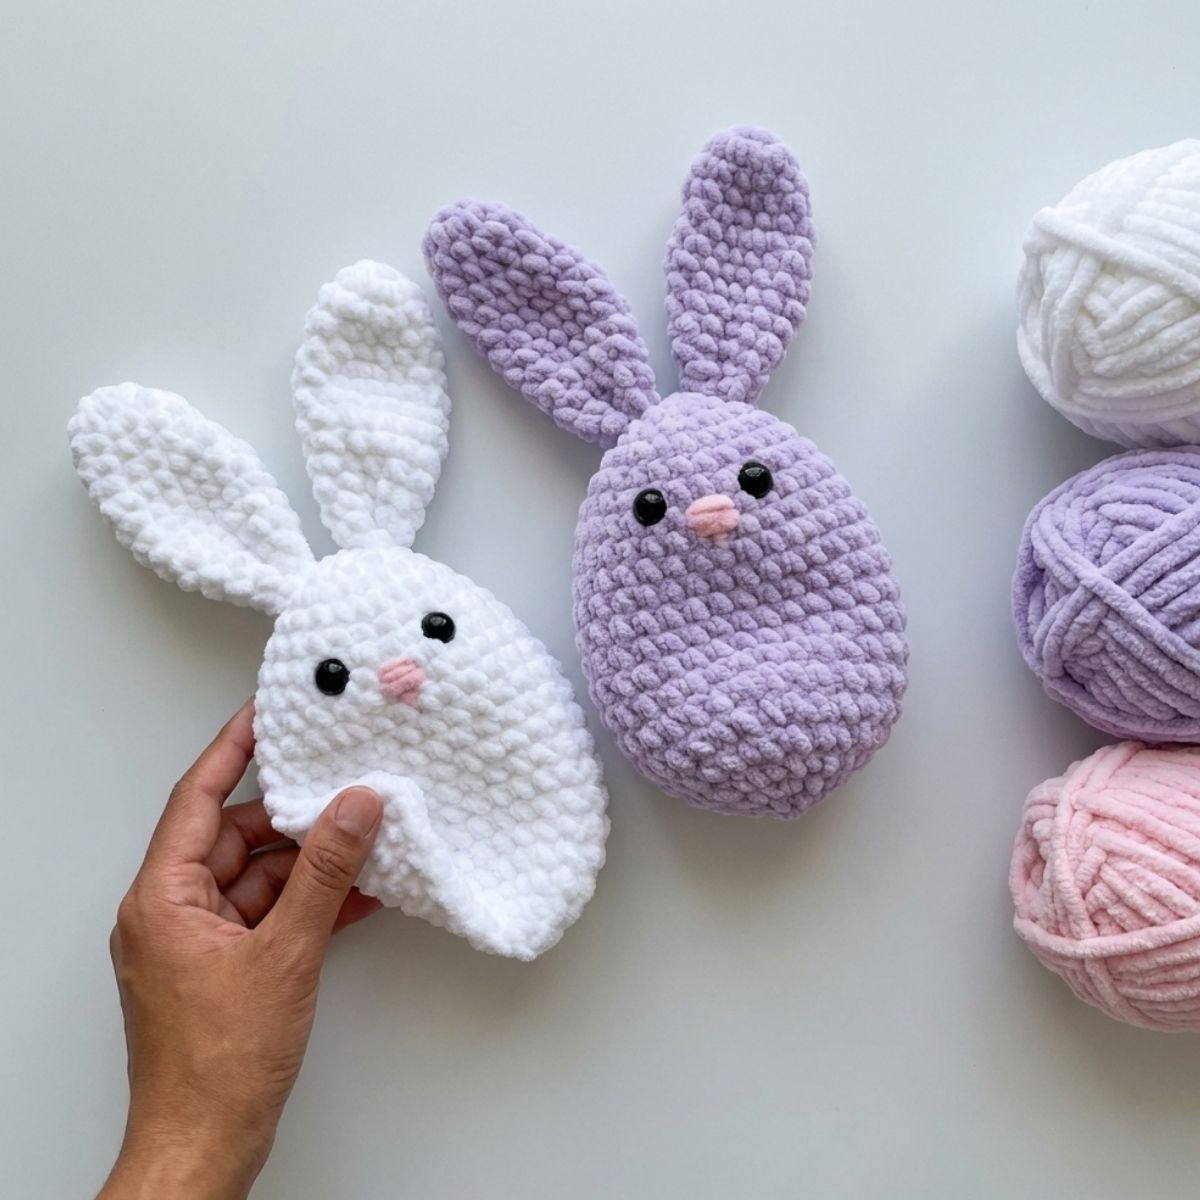
Both the white and the purple bunnies I made are the exact same size. How firmly you stuff yours will affect the final shape. A bit more stuffing gives a rounder, plumper look, while less stuffing creates more of a soft egg shape. Both are adorable.
A note on the Soho Skwishy yarn: it is technically a #5 bulky weight, but it crochets to the same gauge as the Parfait Chunky and feels nearly identical. I did experience a little bit of “worming,” which can happen with chenille yarn. Keeping your magic ring slightly looser helped prevent it for me.
Abbreviations
- ch = chain
- sc = single crochet
- sl st = slip stitch
- st = stitch(es)
- sc 2 tog = single crochet two stitches together (decrease)
Pattern Instructions
Bunny Body
Using your main color yarn, make a magic ring.
R1: 6 sc into ring. Work in continuous rounds. (6 sts)
R2: 2 sc in each st around. (12 sts)
R3: *Sc in next st, 2 sc in next st. Repeat from * around. (18 sts)
R4: *Sc in next 2 sts, 2 sc in next st. Repeat from * around. (24 sts)
R5: Sc around. (24 sts)
R6: *Sc in next 3 sts, 2 sc in next st. Repeat from * around. (30 sts)
R7: Sc around. (30 sts)
R8: *Sc in next 6 sts, 2 sc in next st, sc in next 7 sts, 2 sc in next st. Repeat from * once. (34 sts)
R9-14: Sc around. (34 sts)
R15: *Sc in next 6 sts, sc 2 tog, sc in next 7 sts, sc 2 tog. Repeat from * once. (30 sts)
R16: *Sc in next 3 sts, sc 2 tog. Repeat from * around. (24 sts)
R17: *Sc in next st, sc 2 tog. Repeat from * around. (16 sts)
Insert safety eyes between rows 6 and 7, leaving 5 stitches between them. Begin stuffing now and continue to add stuffing as you finish the bunny.
R18: *Sc 2 tog. Repeat from * around. (8 sts)
Fasten off. Weave the end through the last stitches and pull tight to close.
Ears (Make 2)
Using your main color yarn, make a magic ring.
R1: 6 sc into ring. Work in continuous rounds. (6 sts)
R2: 2 sc in each st around. (12 sts)
R3-5: Sc around. (12 sts)
R6: *Sc in next 3 sts, 2 sc in next st. Repeat from * around. (15 sts)
R7-9: Sc around. (15 sts)
R10: *Sc in next 3 sts, sc 2 tog. Repeat from * around. (12 sts)
R11-12: Sc around. (12 sts)
R13: *Sc in next 2 sts, sc 2 tog. Repeat from * around. (9 sts)
R14: Sc around. (9 sts)
Sl st to the next stitch. Fasten off, leaving a long strand for sewing.
Fold the bottom edge of the ear in half and whip stitch it closed. Then sew each ear on top of the head at an angle, over rows 2 and 3, or wherever looks best to you.
Finishing: Nose
Thread your tapestry needle with pink yarn. Referring to the finished photo for placement, make 3 horizontal stitches side by side to form the nose. Then make one short vertical stitch underneath the nose to complete the look. Fasten off and weave in all ends.
Tips
Here are a few things I learned while making this crochet amigurumi bunny that I think will really help you.
Use a stitch marker faithfully from round one. The chenille yarn makes it harder to see individual stitches clearly, and it is easy to lose your place without one.
Go down a hook size from what the yarn label recommends. This keeps your stitches tight enough that the stuffing does not show through and helps the bunny hold its shape nicely.
Stuff firmly but not so tightly that the bunny becomes hard. You want it to feel soft and squishy when squeezed. That is the whole point of this sweet little guy.
If you experience worming with the chenille yarn, try loosening your tension slightly, especially when starting your magic ring. If it happens when weaving in ends, simply cut a fresh strand of yarn to use for sewing instead.
The pink nose is tiny but it makes a huge difference. Take your time with those few little stitches and refer to the photo. It really brings the whole face together.
Frequently Asked Questions
How long does it take to make this crochet amigurumi bunny? This is a quick project that most crocheters can finish in one evening. Because you are working with super bulky yarn and a 5 mm hook, the rounds work up fast. The whole bunny, including the ears and finishing, takes about 2 to 3 hours for an intermediate crocheter.
What yarn is best for this bunny pattern? Premier Parfait Chunky in a size 6 super bulky weight is my top recommendation. It is soft, squishy, and gives the finished bunny that plush stuffed-animal look and feel. Soho Skwishy from Herrschner’s works beautifully too and crochets to the same gauge.
Can a beginner make this crochet amigurumi bunny? Yes, with a little patience. This pattern uses only single crochet and basic increases and decreases. If you are comfortable working in rounds and have made a few simple projects before, you will be able to follow along. Just use a stitch marker and go slowly in the decrease rounds.
Can I use a different yarn weight? Absolutely. Gauge is not critical for this pattern. You can use worsted weight for a smaller bunny or any bulky yarn you love. Just adjust your hook size to match your yarn so your stitches stay tight.
Is this bunny safe for babies and young children? The bunny is safe for children, but if you are making it for a very young child or baby, skip the safety eyes. Embroider the eyes with yarn instead so there are no small parts that could come loose. The rest of the pattern is completely safe.
I share daily crochet inspiration on Pinterest. Save this article to your Pinterest boards so you can come back to it whenever you are ready to start.


