This darling little crochet turkey has completely stolen my heart. He is cute. He is squishy. He is quick to crochet. Meet Toby, quite possibly my most favorite amigurumi design I have ever made. I have been dreaming of a crochet turkey pattern for forever, and honestly it was quite the challenge to figure out. The back feathers are the trickiest part. How do you crochet something that actually looks like a fan of colorful feathers without losing the charm of the turkey body behind them?
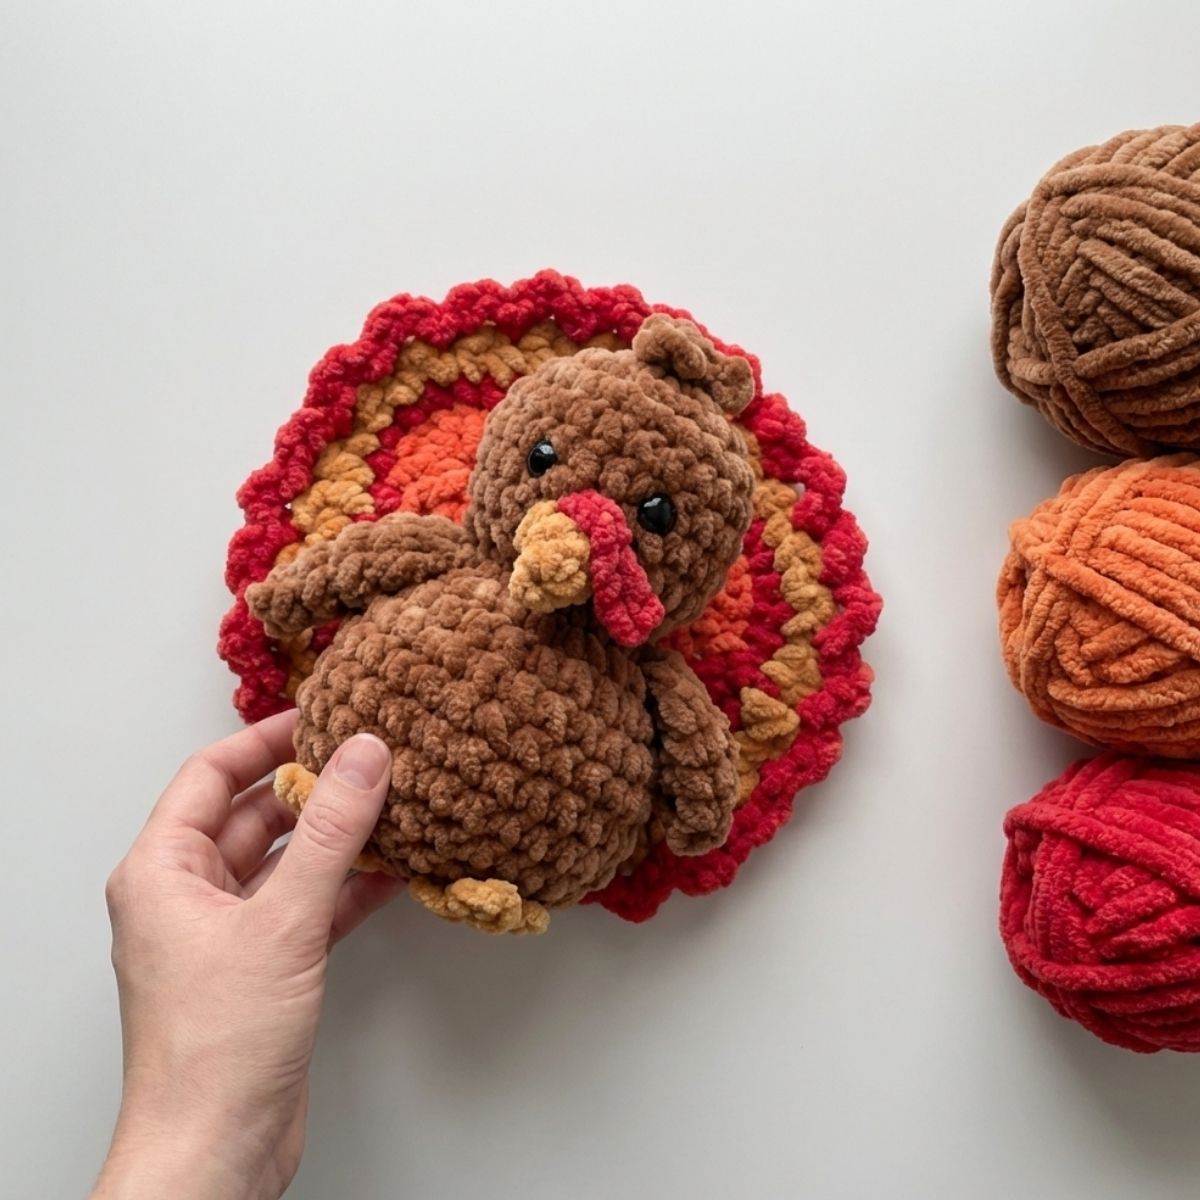
If you have ever searched for crochet turkey amigurumi patterns, you know exactly what I mean. A darling little body can get completely lost in feathers that just do not work. And those feathers have to look good from both the front and the back, and they have to stand up just right. After a lot of experimenting, I found two things that make this design work beautifully: a Super Bulky weight chenille yarn crocheted with a smaller than expected hook, giving the piece just the right amount of stiffness, and a modified African Flower motif for the tail feathers. I used Premier Parfait Chunky yarn and I am so happy with how Toby turned out.
Materials and Tools
- Super Bulky Weight #6 chenille yarn (Premier Parfait Chunky recommended)
- Brown: 39 yards (sample color: Teddy Bear)
- Gold: 16 yards (sample color: Mustard)
- Red: 12 yards (sample color: Cardinal Red)
- Orange: 11 yards (sample color: Mango)
- US H8 / 5.00 mm crochet hook
- 10 mm safety eyes (if making for a baby or young child, embroider eyes instead)
- Stitch markers
- Fiberfill stuffing
- Tapestry needle and scissors
Gauge and Finished Size
My gauge is 6 sc to 2 inches. Gauge is not critical for this pattern. You can use other weights of yarn and adjust your hook size accordingly.
The finished crochet turkey body (minus the back feathers) is approximately 6 inches tall by 4.5 inches wide. The back feather piece curves against the body and has a wingspan of about 6.75 inches.
Pattern Notes
The head and body of this crochet turkey are worked in one piece, starting at the top of the head, decreasing down to form the neck, then increasing again to form the body. The tail feather piece is a modified African Flower motif with a scalloped edge. All the little details like the beak, wattle, wings, feet, and top feathers are made separately and sewn on at the end.
Working with a smaller hook than recommended for the yarn weight gives the finished pieces more structure and stiffness. This is really important for the feather motif especially, so that it holds its shape and stands upright behind the turkey body.
Abbreviations
- ch = chain
- dc = double crochet
- hdc = half double crochet
- sc = single crochet
- sl st = slip stitch
- st = stitch(es)
Special Stitches
Long Single Crochet (long sc): Work this exactly like a regular single crochet, but instead of working into the current row, drop down and work into a lower row beneath. Insert your hook into the designated spot and pull up a loop so that the top of the stitch sits where a normal single crochet would sit. Yarn over and pull through both loops, just like a normal single crochet.
Crochet Turkey Pattern Instructions
Tail Feather Motif (Modified African Flower)
Using gold yarn, ch 4 and join with a slip stitch to form a ring.
R1: Work all stitches in this round into the ring. Ch 3 (counts as 1st dc), dc, ch 1. *2dc, ch 1, repeat from * 4 more times. Sl st to top of starting ch 3. (6 groups of 2 dc.) Fasten off gold yarn.
R2: Join orange yarn in any ch-1 space from the previous round. Working in the same space as joining, ch 3 (counts as 1st dc), dc, ch 2, 2dc, ch 1. *In next space work (2dc, ch 2, 2dc, ch 1). Repeat from * 4 more times. Join with sl st to top of starting ch 3.
R3: Sl st to 1st space. Ch 3 (counts as first dc), work 6dc in same space, ch 1. *In next space work (7dc, ch 1). Repeat from * 4 more times. Join with sl st to top of starting ch 3. Fasten off orange yarn.
R4: With red yarn and starting on the side of any petal, work sc around. Work a long sc in between each petal by inserting hook into the middle of the 2dc from round 1 and pulling up a loose loop. Continue working sc in every petal stitch and a long sc in between each petal. Sc to top of starting sc. Fasten off red yarn.
R5 (Note: This round turns the African Flower into a circle): Attach gold yarn 2 stitches to the left of a long sc stitch from the prior round. Ch 1 and work sc in the same stitch, sc in next st, 2sc in next st, sc in next 2 st, hdc in next st, dc in next st (this is the long sc from the previous round), hdc in next st. *Sc in next 2 st, 2sc in next st, sc in next 2 st, hdc in next st, dc in next st (this is the long sc from the previous round), hdc in next st. Repeat from * around. At end of round, join to top of first sc. Fasten off gold yarn.
R6: With red yarn, sl st to any stitch, ch 3, skip 1 st, sl st in next st (1st loop made). *Ch 3, skip 1 st, sl st in next st (loop made). Repeat from * for a total of 23 loops. Then **ch 1, skip 1 st, sl st to next stitch. Repeat from ** until end of round. Join to starting sl st. Fasten off yarn and weave in all ends.
Crochet Turkey Head and Body
The head and body are worked in one piece, starting at the top of the head.
Make a magic ring.
R1: 6 sc into ring. (6 sts) Work in rounds.
R2: 2 sc in each st. (12 sts)
R3: *Sc in next st, 2 sc in next. Repeat from * around. (18 sts)
R4: *Sc in next 2 st, 2 sc in next. Repeat from * around. (24 sts)
R5-8: Sc around. (24 sts)
R9: *Sc in next 2 st, sc next 2 st together. Repeat from * around. (18 sts)
R10: *Sc in next st, sc next 2 st together. Repeat from * around. (12 sts)
Insert safety eyes between rows 6 and 7, leaving 4 stitches between them. Stuff the head and continue to stuff the body as you work.
R11: *Sc in next st, 2 sc in next. Repeat from * around. (18 sts)
R12: *Sc in next 2 st, 2 sc in next. Repeat from * around. (24 sts)
R13: Sc around. (24 sts)
R14: *Sc in next 5 st, 2 sc in next. Repeat from * around. (28 sts)
R15-18: Sc around. (28 sts)
R19: *Sc in next 5 st, sc next 2 st together. Repeat from * around. (24 sts)
R20: *Sc in next st, sc next 2 st together. Repeat from * around. (16 sts) Firmly stuff body.
R21: *Sc next 2 st together. Repeat from * around. (8 sts) Fasten off, weave end through last stitches, and pull tight.
Beak
With gold yarn, make a magic ring.
R1: 4 sc into ring. (4 sts) Work in rounds.
R2: (Sc in next st, 2sc in next st) twice. (6 sts) Fasten off.
Sew the beak between and just below the eyes. The beak covers all of row 8 and parts of rows 7 and 9, or position as desired.
Wattle
With red yarn, ch 6.
R1: Sl st in 2nd ch from hook, sl st in next 2 chains. Fasten off by cutting yarn and continuing to pull the loop through. Weave in the end on the wrong side. Sew over the top of the beak as shown in the photo.
Top Feathers (Hair)
With brown yarn, *ch 3, sl st in next 2 st, repeat from * 2 more times. Fasten off and sew to the top of the head.
Wings (Make 2)
With brown yarn, make a magic ring.
R1: 4 sc into ring. (4 sts) Work in rounds.
R2: (Sc in next st, 2sc in next st) twice. (6 sts)
R3: (Sc in next 2 st, 2sc in next st) twice. (8 sts)
R4: Sc around. (8 sts)
R5: Fold piece in half, then carefully sc across the double thickness. (4 sts)
R6: Ch 1, (sc next 2 st together) twice. (2 sts) Fasten off, leaving a long strand for joining.
Sew a wing on either side of the body near the neck.
Feet (Make 2)
With gold yarn, ch 3.
R1: Sl st in 2nd ch from hook (1st toe made). *Ch 2, sl st in 2nd ch from hook. Repeat from * once more. (3 toes made.) Then sl st to the very first chain to connect the toes back to the start. Fasten off, leaving a long strand for joining.
Sew feet between rows 19 and 20 of the body, or position as desired.
Assembly
Stand the turkey on a flat surface. Position the back feather piece on the back of the turkey so the non-scalloped portion is at the bottom, sitting behind where the feet are placed. Form fit the feather piece to contour around the head and body.
Using orange yarn, tack the feather piece in a few spots along the center of the turkey. Make sure the stitches are not visible from the front or the back. One stitch at the middle of the back of the head and a few more along the center of the body works well. Once it is securely attached, knot off the yarn and hide the end inside the body.
Weave in any remaining loose ends. Toby is ready to display!
Tips for Making This Crochet Turkey
Using a smaller hook than recommended for your yarn weight is the key to getting the tail feather motif to stand up on its own. Do not skip this detail. It makes all the difference.
The head and body are worked from top to bottom in one continuous piece. Keep your stitch markers handy so you always know where your rounds begin. This pattern moves quickly and it is easy to lose track.
If you are gifting this crochet turkey to a very young child, embroider the eyes instead of using safety eyes. This makes the toy completely safe for little ones.
You can adjust the size of this turkey by going up or down in yarn weight. Just adjust your hook size to maintain a tight fabric with no gaps, so the stuffing does not show through.
The chenille style of Premier Parfait Chunky yarn gives Toby that irresistible soft and squishy look. If you have made the crochet bear snuggler pattern before, you may already have some of the teddy bear brown yarn on hand.
Frequently Asked Questions
How big is the finished crochet turkey? The turkey body, not counting the back feathers, is approximately 6 inches tall and 4.5 inches wide. The back feather piece has a wingspan of about 6.75 inches and curves against the body.
What yarn is best for this crochet turkey pattern? Premier Parfait Chunky in Super Bulky weight is the recommended yarn. The chenille texture gives it a soft and squishy finish that makes the turkey look especially adorable. If you cannot find a specific color, check Etsy sellers who stock the full range.
Is this crochet turkey pattern good for beginners? This pattern uses basic crochet stitches like single crochet, double crochet, and slip stitch, along with one special stitch (long single crochet). It is a great project for someone who is comfortable with amigurumi basics and working in the round.
Can I make this turkey safe for babies? Yes. Simply embroider the eyes using yarn instead of using plastic safety eyes. This makes the finished turkey completely safe to give to babies and young children.
Can I sell items made from this crochet turkey pattern? Many independent designers allow small-scale crafters to sell finished items made from their patterns. Check the original pattern page for the designer’s specific terms of sale before selling finished pieces.
I share daily crochet inspiration on Pinterest. Save this article to your Pinterest boards so you can come back to it whenever you are ready to start.


